
Introduction to Pumpkin Oreo Balls
If you're searching for a delightful dessert that screams fall, look no further than Pumpkin Oreo Balls. These little bites of joy effortlessly blend the beloved flavors of pumpkin and chocolate, making them a perfect treat for autumn gatherings or cozy nights at home. With just a handful of ingredients, this no-bake recipe will have you whipping up a sweet masterpiece in no time.
What Makes Pumpkin Oreo Balls So Irresistible?
So, what makes these Pumpkin Oreo Balls truly special? Firstly, the combination of creamy cream cheese and crushed Oreo cookies creates a rich, decadent filling that melts in your mouth. The addition of pumpkin spices—think cinnamon and nutmeg—infuses your dessert with that warm, comforting flavor we all crave in the fall season.
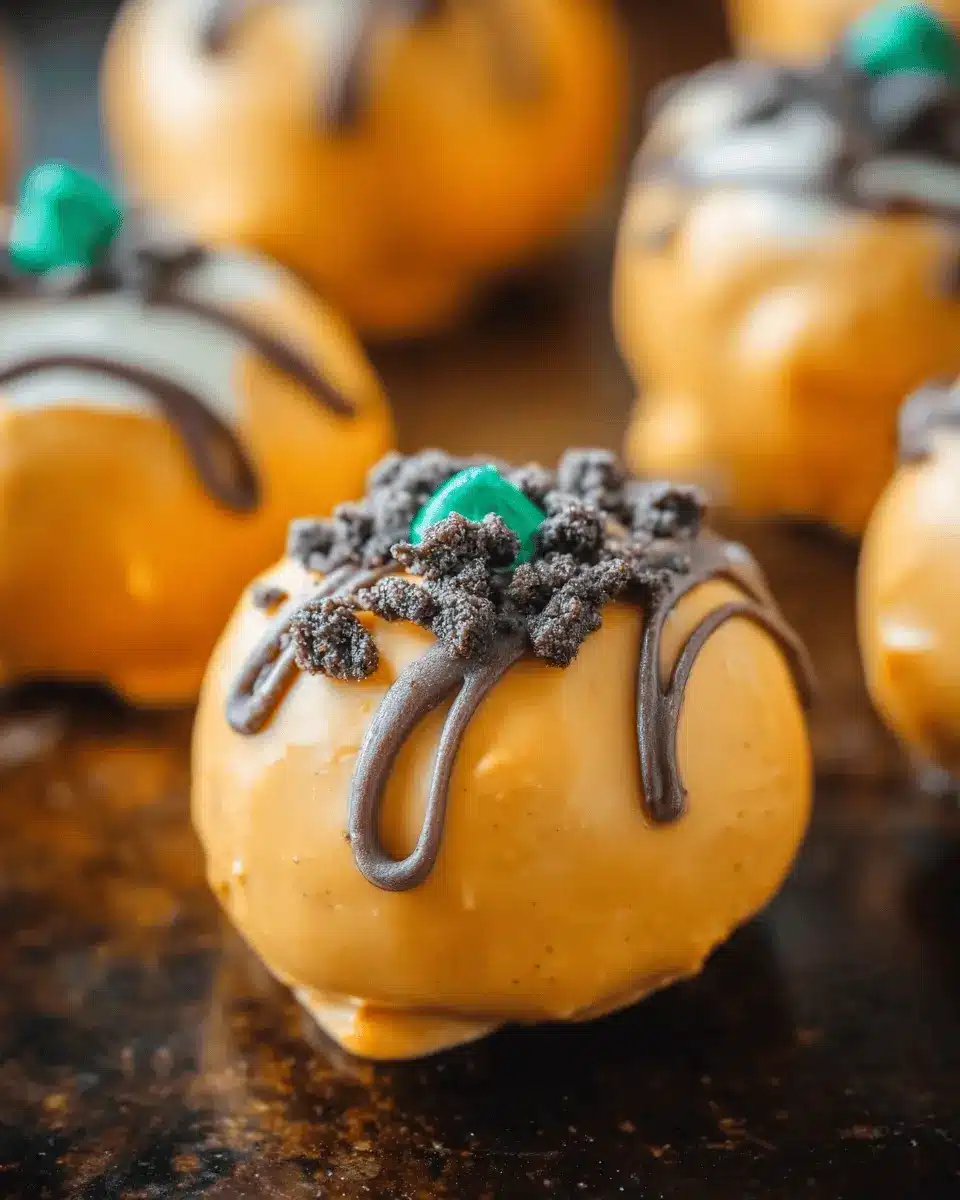
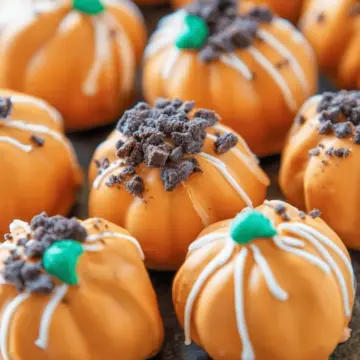
But it doesn’t stop there! Dipping these aromatic bites in vibrant (and festive!) orange candy melts not only adds a visual appeal but also a delightful crunch. When you top them with a small pretzel stick and a splash of icing to resemble leaves, you’ve crafted a bite-sized fall wonder that’s not only delicious but also Instagram-worthy.
So gather your friends, roll up your sleeves, and get ready to dive into a delightful dessert experience with these Pumpkin Oreo Balls. For more pumpkin-infused goodness, check out our guide on pumpkin recipes here.

Ingredients for Pumpkin Oreo Balls
Creating delightful Pumpkin Oreo Balls is a breeze with just a few simple ingredients! Here’s what you’ll need for this easy and scrumptious no-bake treat that combines the beloved taste of Oreos with the seasonal flavor of pumpkin.
- 36 Oreo cookies: The classic chocolate cookie is the foundation of these delicious bites. The rich flavor pairs perfectly with the creaminess of the cream cheese.
- 8 oz cream cheese: Softened cream cheese adds a delightful richness and helps bind the crumbled Oreos into a moldable mixture. Ensure it's at room temperature for easy mixing.
- 12 oz orange candy melts: These candy melts will give your Oreo balls that vibrant autumn hue representing pumpkins. They melt easily and create a sweet coating that hardens beautifully.
While you gather these ingredients, think about personalizing your Pumpkin Oreo Balls with unique toppings! Options like crushed nuts or sprinkles can add a festive touch. Explore more tips on flavor pairings here. Who knew treats could bring so much joy?
Preparing Pumpkin Oreo Balls
Creating these delightful Pumpkin Oreo Balls is a fun and engaging process that even newbie bakers can enjoy. Let’s walk through the steps together!
Gather the ingredients
First things first: you need to gather all the essential ingredients. Here's what you'll need for your Pumpkin Oreo Balls:
- 36 Oreo cookies
- 8 oz cream cheese, softened (for that delicious creamy texture)
- 12 oz orange candy melts (these are key for the vibrant pumpkin appearance)
Having everything prepped will make this entire experience smoother. Plus, it saves you the hassle of running around mid-recipe!
Crumble the Oreos
Once you have your ingredients ready, it’s time to start crumbling those Oreos. Using a food processor is the quickest way to achieve that fine crumb consistency. Pulse the Oreo cookies until they resemble powder; this forms the base for your Pumpkin Oreo Balls. If you don’t have a food processor, place the cookies in a resealable plastic bag and crush them with a rolling pin. Just be careful not to get too excited and end up with crumbs everywhere!
Mix in the cream cheese
Now, let’s bring the two main ingredients together. In a mixing bowl, add the finely crumbled Oreos and your softened cream cheese. Combine them until the mixture is smooth, with no visible cream cheese lumps—this not only helps bind your balls but also ensures that each bite is perfectly creamy. An electric mixer or a sturdy spatula will work wonders here!
Shape into balls
Next, it's time for some hands-on crafting! Scoop out the mixture and shape it into 1-inch balls. Place them on a parchment-covered baking sheet. This is where the magic happens, and your Pumpkin Oreo Balls will begin to take form. Refrigerate these for about 15 minutes to firm up a bit—trust me, a little chill helps the balls hold their shape during the next steps.
Refrigerate before decorating
After your 15 minutes, pop those Oreo balls back in the refrigerator for another 10. While you’re waiting, think about how you want to decorate. These snowy little treats are about to get transformed into adorable pumpkins, and you want to be ready!
Melt the orange candy melts
Now for the fun part! Melt your orange candy melts over a double boiler or in the microwave, following the package instructions. If you’re using the microwave, melt in short bursts (15-30 seconds), stirring between, until smooth. A smooth consistency is the goal here—it ensures your Pumpkin Oreo Balls are evenly coated.
Dip and decorate the pumpkin Oreo balls
Once melted, dip each chilled Pumpkin Oreo Ball into the orange candy melt. Shake off any excess coating; you want them to look good but not overly drippy. Then, while the coating is still wet, place a small pretzel stick on top and add a green icing decoration, creating a charming little pumpkin scene.
Finally, place the decorated balls back on the baking sheet and refrigerate until they're ready to serve. These Pumpkin Oreo Balls not only look fantastic but taste amazing too! Enjoy sharing them with friends or keeping them all for yourself—they're that good.

Variations on Pumpkin Oreo Balls
Pumpkin Spice Oreo Balls
Looking to spice things up with your Pumpkin Oreo Balls? Consider adding a splash of pumpkin spice mix to the cream cheese and Oreo mixture. This will infuse your treats with a delightful, warm flavor that perfectly complements the pumpkin theme. You can also roll your finished balls in a mixture of graham cracker crumbs and pumpkin spice for an extra crunch and seasonal flair!
Gluten-Free Pumpkin Oreo Balls
If you're catering to gluten-free friends, don't fret! Simply substitute regular Oreos with gluten-free Oreo cookies, and you'll have a deliciously safe treat for everyone to enjoy. These gluten-free Pumpkin Oreo Balls will still pack the same delightful flavor and texture, ensuring no one misses out on this seasonal delight. Check out brands like Gluten-Free Oreo for great options.
These variations make it easy to customize your treats for any gathering!
Cooking Tips and Notes for Pumpkin Oreo Balls
When making Pumpkin Oreo Balls, don’t skimp on chilling time! Properly chilling the mixture allows for easier shaping and enhances flavors. Use a small cookie scoop for uniformity, ensuring they’re all around the same size for even coating.
If you want to get creative, consider customizing your toppings! Instead of pretzel sticks, try using walnuts or mini candy corn for added texture. For the orange coating, maintain a consistent temperature when melting your candy melts; too hot may impact the consistency.
For storage, keep these delicious treats in an airtight container in the fridge. They’re perfect for parties or holiday gatherings! For more fun dessert ideas, check out Food Network or Taste of Home.
Serving suggestions for Pumpkin Oreo Balls
When it comes to enjoying Pumpkin Oreo Balls, the presentation can take your dessert game to the next level. Here are some fun serving ideas:
-
Cute Display: Arrange your pumpkin balls on a decorative platter garnished with crushed graham crackers to mimic pumpkin patch soil. This adds a fun visual element and some crunch.
-
Festive Treat Bags: Package individual Oreo balls in clear treat bags, tied with orange ribbon, for a perfect grab-and-go treat at parties or as Halloween favors.
-
Pair with Beverages: Serve alongside a warm cup of pumpkin spice latte or apple cider to enhance the seasonal flavor experience. Their rich taste will complement these drinks wonderfully.
Looking for more serving inspiration? Check out this Pumpkin Dessert Ideas blog for even more delicious ways to celebrate autumn!
Time Breakdown for Pumpkin Oreo Balls
Preparation Time
Get your ingredients ready and whip these up in just 20 minutes! Mixing the Oreo cookies with cream cheese is the fun part where creativity shines.
Chilling Time
Let those Pumpkin Oreo Balls chill for about 25 minutes. This helps the flavors meld beautifully and gives them a nice firm texture.
Total Time
In just 45 minutes, you’ll have a delicious batch of Pumpkin Oreo Balls ready to impress your friends or an easy fall dessert option for any occasion!
Want more delicious ideas? Check out this roundup of no-bake desserts. Not only is it a handy guide, but it also features various creative options that you can whip up in no time!
Nutritional Facts for Pumpkin Oreo Balls
Calories
Each serving of these delightful Pumpkin Oreo Balls contains approximately 150 calories. This makes them a satisfying sweet treat that won't completely derail your healthy eating plan when enjoyed in moderation.
Protein
In terms of protein, you'll find about 1.5 grams per ball. While it's not a main source of protein, the cream cheese does provide a bit of that creamy goodness while also contributing to the texture.
Sodium
With around 90 milligrams of sodium per serving, these Pumpkin Oreo Balls are relatively mild in salt content. They're a fantastic option for those keeping an eye on their sodium intake while craving something sweet.
If you're curious about variations or want to explore healthier alternatives, this article from the Mayo Clinic provides great insights on sweet treats without compromising health. Whether celebrating fall or just enjoying a cozy night in, these Pumpkin Oreo Balls are perfect for every occasion!
FAQs about Pumpkin Oreo Balls
How long can I store Pumpkin Oreo Balls?
You can store your Pumpkin Oreo Balls in the refrigerator for up to one week. Just make sure to keep them in an airtight container to preserve freshness and flavor. If you're planning to keep them longer, you can freeze them for up to three months. Just remember to thaw them in the fridge before serving!
Can I make Pumpkin Oreo Balls ahead of time?
Absolutely! Pumpkin Oreo Balls are perfect for prepping in advance. You can make them a day or two ahead of time and store them in the fridge. They’re even better the next day, as the flavors meld beautifully. Just be sure to add any decorative toppings just before serving for the best presentation.
What can I use instead of candy melts?
If candy melts aren't available, don't worry! You can substitute them with chocolate chips. Simply melt dark, milk, or white chocolate chips using a double boiler or microwave. To get a similar consistency to candy melts, add a splash of vegetable oil to the melted chocolate, which will help it coat the Pumpkin Oreo Balls smoothly.
Conclusion on Pumpkin Oreo Balls
In conclusion, Pumpkin Oreo Balls are the perfect no-bake treat to impress friends and family. With their fun pumpkin shape and delightful flavor, they are a festive addition to any gathering. So why not whip up a batch and add a touch of fall to your dessert table? Enjoy!
Pumpkin Oreo Balls
Equipment
- Food Processor
- double boiler
- microwave
Ingredients
- 36 cookies Oreo
- 8 oz cream cheese softened
- 12 oz orange candy melts
Instructions
- Pulse Oreo cookies in a food processor until finely crumbled.
- Mix in cream cheese until well combined.
- Scoop into 1-inch balls. Refrigerate on a parchment-covered baking sheet for 15 minutes.
- Use a toothpick to score lines into the Oreo balls to resemble pumpkins. Place back into the refrigerator for 10 minutes.
- In the meantime, melt orange candy wafers over a double boiler or in the microwave according to package directions.
- Dip pumpkin oreo balls into melted chocolate, shake off excess, and place back on lined baking sheet. Immediately decorate with a small pretzel stick and leaf icing decoration.
- Refrigerate until ready to serve.

Leave a Reply