
Introduction to Lemon Thumbprints
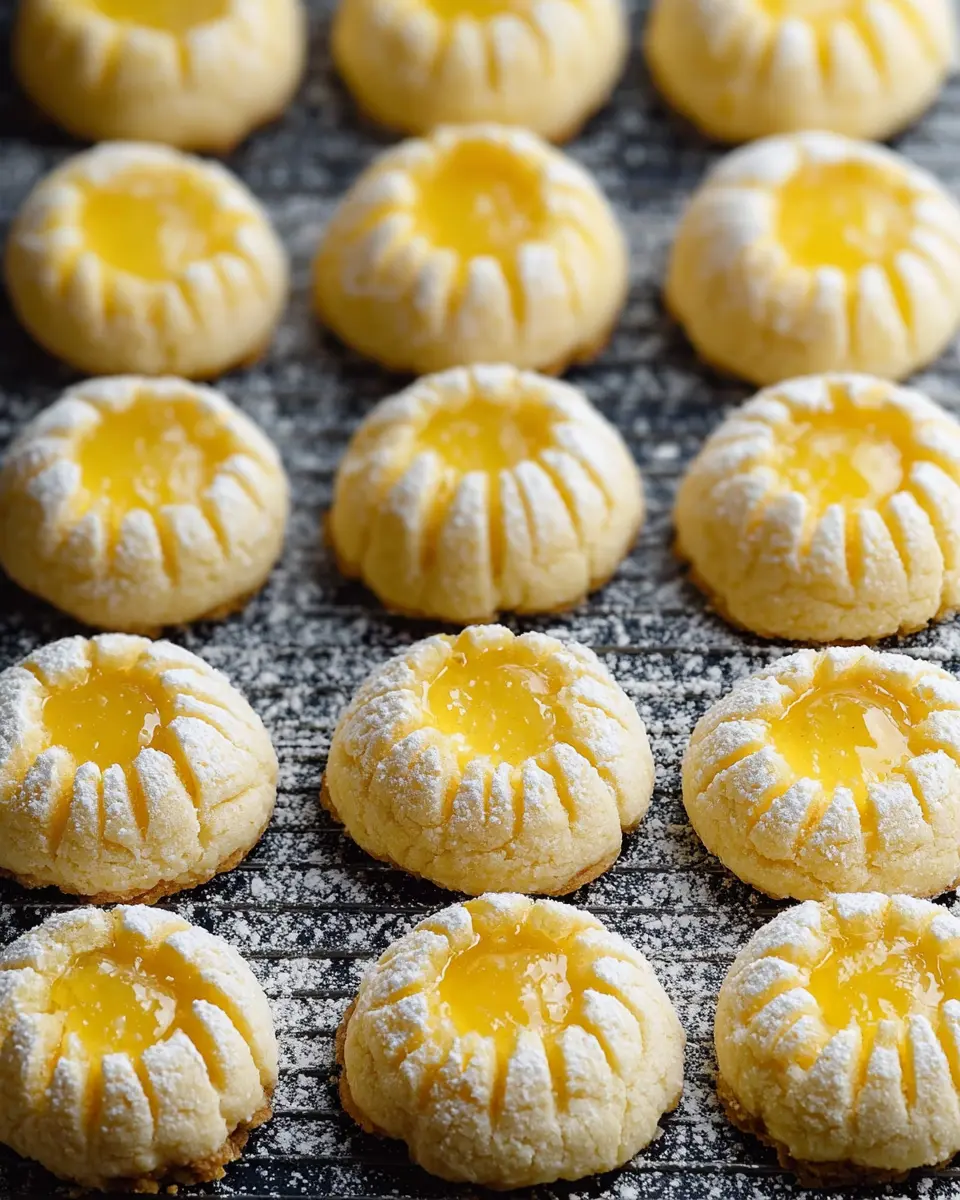
Lemon thumbprints are the perfect homemade treat for any occasion. These delightful cookies combine a buttery, soft texture with a bright and zesty lemon filling, making them irresistible to anyone with a sweet tooth. Not only are they easy to make, but they also bring a burst of sunshine to your dessert table, thanks to their vibrant flavor and cheerful appearance.
Why lemon thumbprints are the perfect homemade treat
You might wonder why lemon thumbprints stand out among other cookies. First and foremost, they feature lemon curd, which adds a deliciously tangy contrast to the sweet dough. If you're short on time, feel free to use store-bought lemon curd or even try a variety of preserves like raspberry or apricot—there's truly something for everyone!
Moreover, the beauty of these cookies lies in their simplicity. With just a few basic ingredients and straightforward steps, you’ll find yourself channeling your inner baker in no time. Perfect for casual gatherings or as a sweet gesture for a friend, lemon thumbprints are a treat that everyone can enjoy, making them a fantastic addition to your baking repertoire.
If you're excited to embark on this culinary adventure, let's dive into the full recipe!
Ingredients for Lemon Thumbprints
When it comes to baking delightful lemon thumbprints, having the right ingredients is essential. Let's break down what's needed for each component of this tasty treat!
Essential Ingredients for the Cookie Dough
For a luscious and melt-in-your-mouth cookie dough, you'll need:
- All-purpose flour: 2 and ¼ cups, spooned and leveled
- Cornstarch: 1 tablespoon adds a tender touch
- Salt: ¼ teaspoon to enhance flavor
- Unsalted butter: 14 tablespoons, softened to room temperature for that creamy consistency
- Granulated sugar: ¾ cup to sweeten your cookies
- Fresh lemon zest: 1 tablespoon for a burst of citrus flavor
- Fresh lemon juice: 1 tablespoon to keep things zesty
- Large egg: 1, at room temperature to bind everything together
- Vanilla bean paste: 1 teaspoon for an extra layer of flavor
Ingredients for the Coating and Filling
To finish off these delightful cookies, you’ll need:
- Granulated sugar: ½ cup for rolling the dough balls
- Lemon curd: ½ cup, whether homemade or store-bought, to create that creamy center—check out this lemon curd recipe!
Ingredients for the Icing
Lastly, to drizzle that perfect finishing touch, gather:
- Confectioners’ sugar: 1 cup for a sweet glaze
- Fresh lemon juice: 2 tablespoons to keep the icing bright and tart
With these ingredients in hand, you're ready to create scrumptious lemon thumbprints that will leave everyone coming back for more. Happy baking!
Preparing Lemon Thumbprints
Creating the perfect lemon thumbprints is a delightful journey filled with vibrant flavors and a few simple steps. Whether you’re a baking novice or a seasoned pro, this guide will ensure your cookies turn out beautifully every time. Let’s dive right into the preparations!
Gather and prepare the ingredients
Start by ensuring you have everything you need on hand; this will make the process much smoother and enjoyable. Here’s what you'll require for the dough and the filling:
-
Dough:
-
All-purpose flour
-
Cornstarch
-
Salt
-
Unsalted butter (softened)
-
Granulated sugar
-
Fresh lemon juice and zest
-
Egg (room temperature)
-
Vanilla bean paste (or vanilla extract)
-
Coating & Filling:
-
Granulated sugar
-
Lemon curd (homemade or store-bought)
-
Icing:
-
Confectioners' sugar
-
Fresh lemon juice
Have a look at the original recipe for additional tips here.
Make the cookie dough
First, whisk together the dry ingredients—flour, cornstarch, and salt—in a medium bowl. Meanwhile, using a mixer, cream the softened butter and granulated sugar until light and fluffy. This step is key for a tender cookie texture! Then, mix in the lemon zest, juice, egg, and vanilla, ensuring everything is well combined. Fold the dry ingredients into the wet mixture until just absorbed; this will create a creamy dough.
Chill the dough for optimal texture
After mixing your dough, it’s time for the crucial refrigeration step! Cover the dough and refrigerate for at least three hours (or up to three days). Chilling the dough not only enhances the flavor but also keeps the cookies from spreading too much while baking. It's the secret to achieving that perfect texture!
Shape, coat, and fill the thumbprints
When you're ready to bake, preheat your oven to 350°F (177°C) and prepare your baking sheets with parchment or silicone mats. Scoop out tablespoon-sized portions of dough, roll them into balls, and coat them in granulated sugar. Place them on the sheets about two inches apart and gently press your thumb into the center of each ball to create an indentation. Fill this little well with about half a teaspoon of lemon curd—this is where the magic happens!
Bake the lemon thumbprints to perfection
Bake your cookies for 12 to 13 minutes, or until the edges start to set and turn lightly golden. The aroma of fresh lemon will fill your kitchen, inviting everyone in for a taste! Allow the cookies to cool for a few minutes on the sheet before transferring them to a wire rack.
Drizzle with lemon icing and let cool
While the cookies cool, whisk together confectioners' sugar and fresh lemon juice for the icing. Once your cookies have cooled down completely, drizzle the icing over them using a spoon or a squeeze bottle for a pretty presentation. In about 30 minutes, the icing will set, allowing you to stack or store your delicious lemon thumbprints with ease!
By following these steps, you’re well on your way to creating these delightful cookies. Enjoy a batch with your friends or keep them all to yourself—they're just that good!

Variations on Lemon Thumbprints
Using different preserves instead of lemon curd
One of the best things about lemon thumbprints is their versatility! Feel free to swap out the traditional lemon curd for other delicious options. Raspberry, strawberry, or apricot preserves make fantastic substitutes, adding unique flavors to each bite. Each variation gives you a different experience while retaining that soft, buttery texture you love in these cookies. Plus, it’s a great way to use up any leftover jams in your pantry.
Incorporating other citrus flavors
If you want to take your lemon thumbprints to the next level, why not experiment with other citrus fruits? Think orange, lime, or even grapefruit curd! You can mix and match by adding zest from different citrus fruits to the dough, enhancing that bright flavor. This way, you can create a delightful citrus medley that’s perfect for any occasion—bonus points if you invite friends for a taste test!
For some tips on how to make fantastic lime curd or orange curd, check out BBC Good Food for a variety of recipes.
Baking Tips and Notes for Lemon Thumbprints
Importance of Dough Chilling
Chilling the dough is key when making lemon thumbprints. Because the dough is soft and creamy, refrigerating it for at least 3 hours (or up to 3 days) helps to firm it up, making shaping cookies much easier. Plus, a quick chill after shaping, while the oven preheats, prevents the cookies from spreading too much during baking, ensuring that perfect thumbprint shape!
Guidance on Storing and Freezing Cookies
These delightful cookies can be enjoyed fresh or stored for later! Keep your lemon thumbprints covered at room temperature for up to one week. If you want to make them ahead, unbaked dough can be frozen for up to 3 months. Just thaw, coat in sugar, and bake! For more detailed guidance, check out this freezing cookie dough tutorial.

Serving suggestions for Lemon Thumbprints
Pairing Lemon Thumbprints with Your Favorite Beverages
Lemon thumbprints are delightful with both hot and cold beverages. Try pairing them with a refreshing iced green tea for a light, citrusy balance, or enjoy them alongside a rich cup of coffee. If you’re feeling adventurous, consider a sparkling lemonade—the fizz complements the tangy lemon flavor perfectly! Whether you’re enjoying a quiet afternoon or hosting friends, these pairings will elevate your cookie experience.
Creative Ways to Present and Gift the Cookies
If you’re looking to gift your lemon thumbprints, presentation is key!
- Use a decorative tin or box to create an eye-catching gift. Your friends will love the personal touch.
- Consider wrapping them in parchment paper tied with twine for a rustic feel.
- For an extra surprise, include a small jar of homemade lemon curd, so they can indulge even more!
These thoughtful touches can turn a simple cookie into a memorable present.
Time Details for Lemon Thumbprints
Preparation Time
For lemon thumbprints, the preparation will take about 3 hours and 40 minutes. This includes the essential chilling period for the cookie dough, ensuring that your cookies maintain the perfect shape and texture.
Baking Time
The actual baking process is quite quick, spanning just 12 to 13 minutes. You’ll want to keep an eye on them to avoid over-baking—your goal is lightly golden edges!
Total Time
In summary, you’re looking at a total time of about 4 hours. This allows for both preparation and baking, plus the cooling phase. Trust us, the zesty flavor and buttery texture are well worth the wait!
For more tips on how to craft these delightful cookies, you might want to check out this guide on how to make lemon curd or see expert advice on cookie baking tools.
Nutritional Information for Lemon Thumbprints
Understanding the nutritional profile of lemon thumbprints can help you indulge mindfully. Here’s a breakdown of what you’ll find in each cookie:
Calories
Each lemon thumbprint contains approximately 90 calories, making them a delightful treat without being overly indulgent.
Protein
These cookies offer around 1 gram of protein per serving, which isn't much, so consider pairing them with a source of protein like Greek yogurt for a satisfying snack.
Sugar
With about 5 grams of sugar per cookie, lemon thumbprints provide just the right amount of sweetness to brighten your day without going overboard.
Feeling curious about other tasty dessert options or need tips on how to enjoy your cookies? Explore more on healthy snacking habits at Healthline or find creative ways to balance sweets with nutrition at MyFitnessPal.
FAQs about Lemon Thumbprints
Can I make these cookies ahead of time?
Absolutely! You can prepare the dough for lemon thumbprints and refrigerate it for up to 3 days before baking. If you want to get even more ahead, you can freeze the shaped, unbaked dough balls for up to 3 months. Just thaw them for about 30 minutes before rolling in sugar and baking.
What’s the best way to store lemon thumbprints?
To keep your lemon thumbprints fresh, store them in an airtight container at room temperature for up to a week. For longer storage, consider freezing the baked cookies in a single layer before transferring them to a freezer bag, where they’ll stay good for up to 3 months.
Are there gluten-free options for this recipe?
Yes, you can make gluten-free lemon thumbprints by swapping the all-purpose flour for a 1:1 gluten-free baking blend. Many of these blends work well in cookie recipes, but be sure to check the ingredients to ensure they fit your dietary needs. Happy baking! For more gluten-free tips, visit Gluten-Free Living.
Conclusion on Lemon Thumbprints
In conclusion, lemon thumbprints are a delightful treat that combines zesty flavor with a soft, buttery texture. Perfect for gatherings or a cozy night in, these cookies are versatile enough for any occasion. Try experimenting with different preserves or enjoy them with a warm cup of tea—your taste buds will thank you! For more baking inspiration, check out Sally's Baking Addiction for other amazing recipes.

Lemon Thumbprints
Equipment
- mixing bowls
- mixer
- baking sheets
- parchment paper
- whisk
- squeeze bottle
Ingredients
Dough
- 2 ¼ cups all-purpose flour spooned and leveled
- 1 Tablespoon cornstarch
- ¼ teaspoon salt
- 14 Tablespoons unsalted butter softened to room temperature
- ¾ cup granulated sugar
- 1 Tablespoon fresh lemon zest
- 1 Tablespoon fresh lemon juice
- 1 large egg at room temperature
- 1 teaspoon vanilla bean paste or vanilla extract
Coating & Filling
- ½ cup granulated sugar
- ½ cup lemon curd homemade or store-bought
Icing
- 1 cup confectioners’ sugar
- 2 Tablespoons fresh lemon juice
Instructions
Preparation
- In a medium bowl, whisk together the flour, cornstarch, and salt until combined. Set aside.
- In a large bowl using a mixer, beat the butter and granulated sugar together on medium-high speed until creamed, about 3 minutes.
- Add the lemon zest, lemon juice, egg, and vanilla bean paste and beat on high speed until combined.
- Add the dry ingredients to the wet ingredients and mix on low speed until combined. Cover and refrigerate for at least 3 hours.
- Line large baking sheets with parchment paper.
Shaping & Baking
- Scoop cold dough (about 1 Tablespoon of dough each) and roll into balls. Roll each in granulated sugar and place 2 inches apart on lined baking sheets.
- Use your thumb to make an indentation in the center of each cookie dough ball. Fill each with ½ teaspoon of lemon curd.
- Preheat oven to 350°F (177°C). Place baking sheets with unbaked cookies in the refrigerator while the oven preheats.
- Bake shaped cookies for 12–13 minutes or until edges appear set and very lightly browned.
- Remove from the oven and allow cookies to cool on the baking sheet for 5 minutes, then transfer to a wire rack.
Icing
- In a small bowl, whisk together confectioners’ sugar and lemon juice. Drizzle over cooled cookies.

Leave a Reply